The Terminal
Reading what your device says — and what you said back
The terminal is the big window in the middle of the Connection tab. Everything your device sends appears here, and so does everything you send to it — so both halves of the conversation are on the same screen, in the order they happened.
Pick how you want to look at the data
Equipment does not all talk the same way. An inverter exchanges blocks of numbers, a measurement instrument writes readable lines, a controller paints a whole screen. So the terminal has four modes — four ways of showing the very same data. You switch between them with the Mode list above the terminal, and you can switch back and forth at any time: nothing is lost, you are only changing how it is displayed.
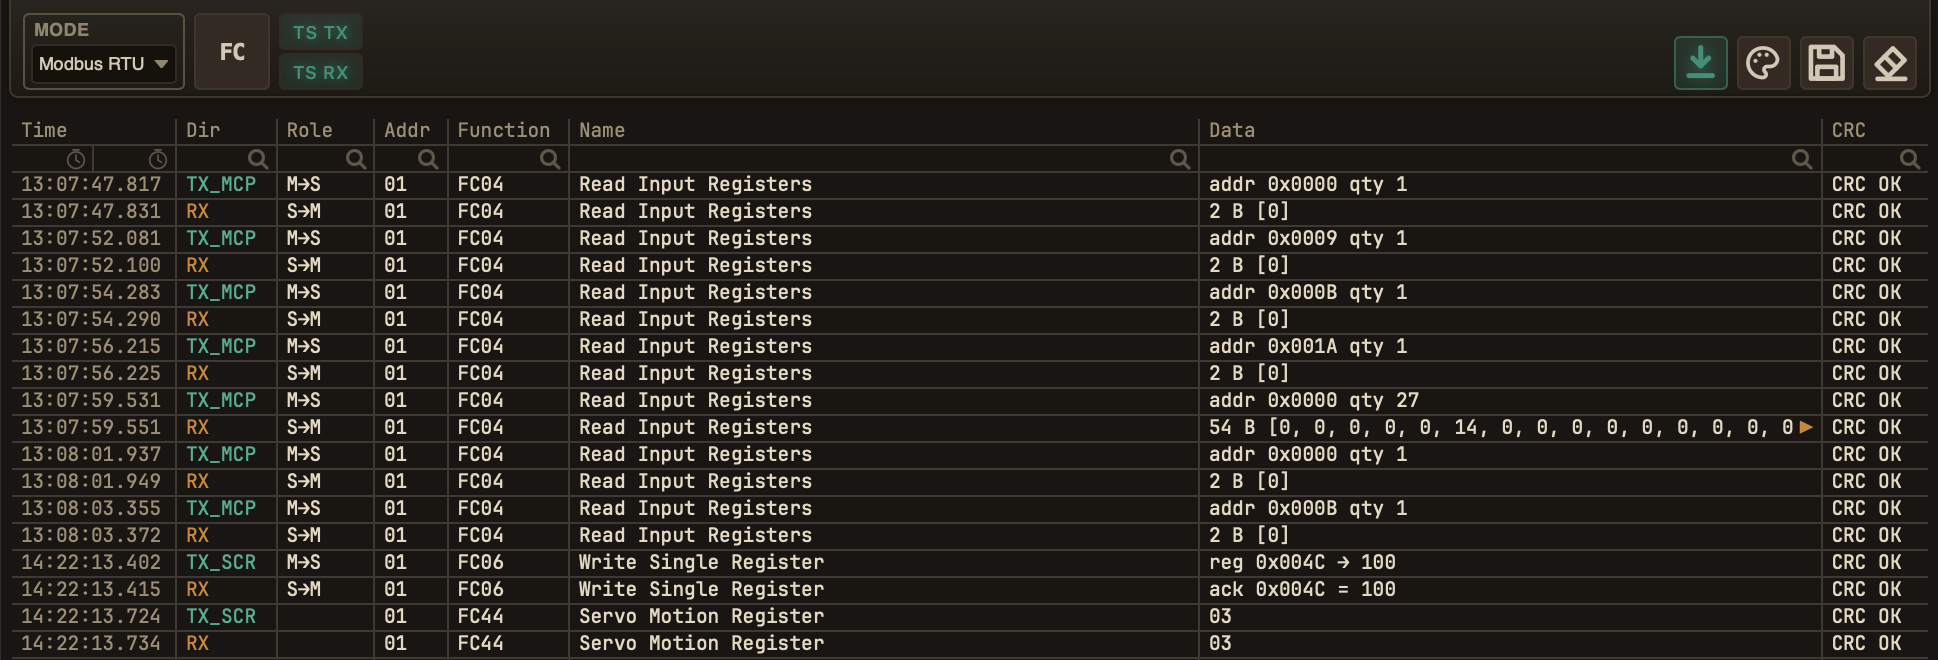
The terminal in Modbus RTU mode — the Mode list is top left, and every question you sent sits directly above the answer that came back
Which one you want depends on your device:
- ASCII — the device writes in words: a measurement instrument reporting readings, a controller console, AT commands to a modem, diagnostic messages. Start here if you are not sure.
- HEX — the device sends numbers, not words. Pick this when ASCII shows nothing but nonsense characters, or when you need to see exactly which bytes went out and came back.
- Modbus RTU — the everyday case on RS-485: frequency inverters, PLCs, servo drives, energy meters, temperature controllers. This mode reads the blocks of numbers for you and writes down what each one means.
- VT100 — the device draws a screen instead of printing lines: a configuration menu you move around with arrow keys, a status display that refreshes in place.
Each mode puts its own controls on the bar above the terminal — there is no shared bar beyond the mode list. What follows is what each mode shows you.
Who sent what — the Dir column
Every mode has a Dir (direction) column. It does more than say RX (received) or TX (sent) — it also says who sent or received it, so you can tell your own typing apart from a script, a macro or the AI assistant. These are the marks you will see in that column:
| Mark | What it means |
|---|---|
RX_PORT |
Bytes that came in from the device over the cable. |
RX_SCR |
A simulated receive — a Lua script called emit_rx to inject
bytes as if they had arrived from the cable. |
TX_CMD |
You sent it from the command bar. |
TX_MCR |
One of the macro buttons on the top bar sent it. |
TX_TRG |
A trigger fired it automatically. |
TX_SCR |
A Lua script sent it. |
TX_AI |
The AI assistant sent it. |
TX_MCP |
An outside MCP client sent it. |
The terminal also shows messages from the Lua script and the programmer — not bytes on the wire, but text the module wanted to print. They live in the same Dir column under their own marks:
| Mark | What it means |
|---|---|
LOG_SCR OK_SCR WARN_SCR ERR_SCR |
A Lua script logged a message — info, success, warning or error. |
LOG_PROG OK_PROG WARN_PROG ERR_PROG |
The programmer logged a message — info, success, warning or error. |
In Modbus RTU mode the same marks sit in the Dir
column, next to a separate Role column that says who was asking and who was
answering on the bus. In HEX mode module messages are not shown at all —
that view is for bytes on the wire, and a script's log() never went on the
wire.
tx_ai shows only what the AI sent,
rx shows everything that came in, and so on. Case does not matter.
ASCII — when the device writes in words
Each line the device sends becomes one row on screen, with the time it arrived. If you sent something, it appears the same way, and the answer lands underneath it.
On the bar above the terminal, from left to right:
- RX EOL (end of line) — how the device marks the end of a line. Leave it on CRLF; if the text comes out glued into one long line, or broken in odd places, try LF or CR. Choosing Raw switches line-splitting off entirely, and you see the data in exactly the portions the device sent it.
- Charset — which alphabet to use. UTF-8 is right almost always. Change it only when letters with accents come out wrong. Nine encodings are on the list: UTF-8, Latin-1 (ISO-8859-1), Windows-1252, ISO-8859-2, Windows-1250, CP437, Windows-1251, Shift_JIS and GBK. Industrial controllers usually want Latin-1 or Windows-1250, DOS-era firmware draws its boxes with CP437, and the last three cover Cyrillic, Japanese and Chinese equipment.
- TS TX and TS RX (time stamps) — show or hide the time in front of what you sent, and in front of what came back.
- ⟨⟩ — show invisible characters. Normally you do not see the ones
that only mark a new line or a tab. Turn this on when a device sends something and
nothing appears: you will then see markers like
⟨0D⟩instead of nothing at all, and you know the data did arrive. - ANSI — some devices send colour along with the text. Leave this on and the colours are painted; turn it off and you will see the raw colour codes as characters.
Click any row to open it up. You will see the full text, and — for data that came from the device — the individual bytes underneath it. This is the quickest way to check what really arrived when a line looks suspicious.
HEX — when there are no words, only numbers
Every byte is shown as a two-digit number, sixteen per row, with a running count on the left so you can say “this is byte number 300”. The column on the right shows the same bytes as characters where a character makes sense, and a dot where it does not.
This is the mode for binary protocols, for firmware dumps, and for the moment when you need to prove exactly what left your computer.
The Save raw bytes button writes the bytes to a file just as they are — not a picture of the screen, but the data itself, ready to be compared with the original or sent to somebody else. It saves what the filters left on screen: with the filter row empty that is the whole capture, and with a filter set it is exactly the rows you are looking at. Filtering down to one device and saving is how you pull a single conversation out of a busy line.
Modbus RTU — the industrial one
Modbus devices exchange short blocks of numbers. Read them by hand and you are counting bytes on your fingers; in this mode the terminal does it for you and fills in a table instead:
- Time — when it happened.
- Dir — which way it went: out of your computer, or in from the device.
- Role — who was asking and who was answering.
M→Sis a question,S→Mis an answer. - Addr — which device on the line. On RS-485 dozens of them share one pair of wires, and the address is what tells them apart.
- Function and Name — what was being asked for, in numbers and in words: “read holding registers”, “write single register”.
- Data — the values themselves, already converted from raw bytes into numbers you can read.
- CRC — every Modbus message carries a checksum. CRC OK means it arrived undamaged; CRC BAD means something is wrong on the line — bad wiring, wrong speed, or interference.
You do not have to be the one asking. Tap into a running RS-485 line and you see the traffic between somebody else's master and its slaves in exactly the same table — which is how you find out what a working installation actually sends, before you write a single command of your own.
Your device uses a function code that is not in the standard? That is normal — manufacturers add their own. Such messages are not thrown away: you see the code, the data and the checksum, with Unknown function where the name would be. Click the FC button and you can type in a name from your device's manual, so from then on it appears written out instead of as a bare number.
VT100 — when the device draws a screen
Some devices do not print lines one after another; they paint a screen and then update parts of it — a menu, a live status display, a configuration form. Shown as plain text that looks like gibberish, because it is full of instructions such as “move the cursor here” and “clear this line”.
This mode carries out those instructions instead of printing them, so you see the screen the device meant to draw. Use the same keys you would use on a real terminal to move around it.
Finding what you need in a flood of data
A device that talks all the time fills the screen quickly. Instead of one search box, every column has its own filter in the row just under the headings — type into the one you care about and only the matching rows stay on screen.
- Type into Function and you see only that one kind of message.
- Type into Addr and you see only the device you are interested in.
- Fill in several columns and they narrow the list together.
- Next to each filter there is a small magnifier. Click it and it becomes a broom: now the filter works the other way round and hides what you typed instead of showing only it. Useful when one chatty message is burying everything else.
- For Time you give a range instead: from when, to when.
- Click a column heading to sort by it. Click it again to reverse the order, and a third time to go back to the order things actually happened in — which in a terminal is information in itself.
Filters and sorting cover everything the terminal remembers, not just what happens to be visible.
Copying something out
Drag across the terminal to select. The selection follows the columns you crossed, so you can take one column out of a hundred rows without dragging in everything beside it. Paste it into a spreadsheet and the columns stay columns.
Right-click gives you Copy, Select All, Clear Terminal, and two shortcuts back to the device: Add to Send puts the selected text into the command box, and Send sends it straight away — handy for repeating a command the device itself printed.
Saving and clearing
Save writes what you see to a file, in whichever mode you are currently in, and always the whole history — not just the rows on screen.
Clear asks first: the button turns red and waits for a second click. That is deliberate — clearing cannot be undone, and it wipes the history for all four modes at once, together with the byte counters.
How much it remembers
The terminal keeps the last 32 MB of data by default — hours of ordinary traffic. When it fills up, the oldest data drops off the top and the newest always gets in.
If you are capturing something long and need more, raise it in Info → Settings… → General → Terminal buffer, up to 2048 MB. The change takes effect at once.