AI Assistant
A chat that knows your serial port — five engines, one panel
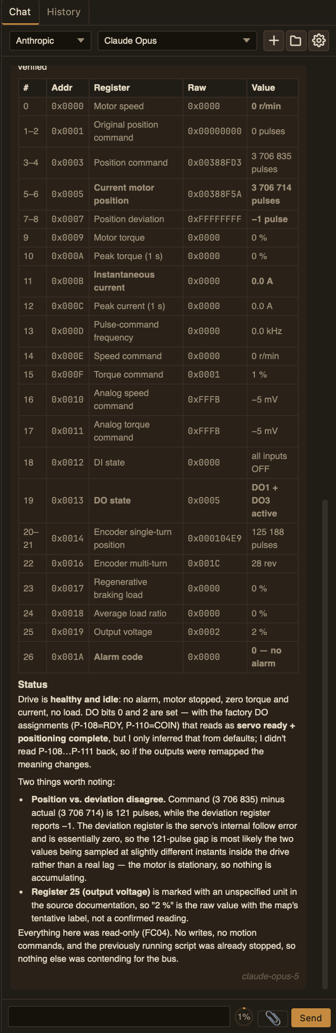
The AI panel — chat on the left, history and settings tabs above
The AI panel lives on the right side of the window. Show it with the AI button in the title bar (see the Menu & Panels chapter). It is a chat assistant that understands your serial work: it sees your port configuration and the recent lines in the terminal, so you can ask it questions in plain words — “what protocol is this?”, “why is my device not answering?”, “decode this frame” — and it answers with that context in mind.
Two tabs sit above the chat: Chat (the conversation) and History (saved sessions — click a row to load one, the trash can on its right deletes it). The ⚙ button opens the Settings panel as an overlay — pick the engine, temperature, custom instructions. A small ring next to the send button shows how much of the context budget is used.
The assistant can also call the app's tools for you — read a file, send a frame, clear the buffer, run a Lua script. When it wants to call one, a card appears asking your permission; approve it and the call runs, refuse it and the assistant answers without that tool.
Five engines, one panel
The same chat, history and settings; what changes is where the answers come from. Pick one in Settings (the ⚙ button) → Engine:
- Local model — a model file on your own disk. No internet, no API key, no account. Runs on your CPU or GPU.
- OpenRouter — one API key, hundreds of cloud models (Claude, GPT, Gemini, Llama, …).
- Claude Code — Anthropic's CLI agent, billed through your Claude.ai subscription.
- Codex — OpenAI's CLI agent, billed through your ChatGPT subscription.
- Gemini — Google's CLI agent, authenticated with a Google API key.
If you already pay for ChatGPT Plus or Claude Pro, you can plug that subscription in as the engine — no new bill, no API key to manage. The sections below describe each engine's setup; the last section covers the parts that work the same in all of them.
Local model
A model file on your own disk — the engine runs entirely on your machine, no internet, no API key, no account. The runtime (llama.cpp) is built into the app, so there is nothing to install.
The model is a file you supply. There is no built-in download — get a GGUF file yourself (Hugging Face is the usual source; a few hundred MB to several GB depending on the model and its quantisation), then open ⚙ → Local model and click Select GGUF file…. The app checks the file, loads it, and adds it to a Recently used list so the next switch is one click. Files you have since deleted drop off that list on their own.
Before loading, the app estimates whether the model plus its context will fit in memory. If it is close to the limit you get a warning rather than a frozen machine — on macOS an oversized model can stall the whole system for half a minute while it swaps. A smaller quantisation (Q4, Q5) is the usual answer.
Pre-tested models that work with the assistant: Nemotron 3 Nano 4B, Qwen3.5 9B, GLM 4.6V-Flash, Gemma 4 E4B, Gemma 4 12B. Other GGUF models may also work; this list is just what we verified.
Hardware: the accelerator is built into the app and follows your system —
Metal on macOS, Vulkan everywhere else (most modern AMD /
NVIDIA / Intel GPUs). There is nothing to choose and nothing to install. What you can
set is how much of the work goes to the card: GPU layers in the engine
settings — all for maximum speed, 0 to run on the processor alone, and
anything between when the model does not quite fit in video memory. Next to it,
CPU threads sets how many cores the processor side uses. If the app finds no
graphics card it says so plainly and everything runs on the processor.
Smaller models (3B–7B parameters) work on most laptops; larger ones need 16+ GB RAM.
This engine is marked Local (beta) because of a known issue: during the prefill phase (the model chewing on your prompt before it writes anything) the ComIO window itself can drop to around 1 FPS. Other apps stay smooth at the same time; the cause is the GPU being shared between the model and the app's own drawing. The generation phase is smooth.
OpenRouter
OpenRouter is a single API gateway to hundreds of LLMs — Claude, GPT, Gemini, Llama, Mistral, DeepSeek and more — with one API key and one bill. No terminal, no CLI install — just paste a key into the app.
- Create an account at openrouter.ai and top up some credit (pay-as-you-go).
- Go to openrouter.ai/keys and generate a new API key (it looks like
sk-or-v1-…). - In ComIO.Studio, open the AI panel → ⚙ → OpenRouter.
- Paste the key, pick a model from the dropdown, and save.
The model list comes straight from OpenRouter, so new models appear without an app update. The dropdown shows each model's context window — they differ by orders of magnitude, from around 8 thousand to around 2 million tokens.
Web search and page fetching are built into this route (OpenRouter runs them on its side). If you need the assistant to browse, use OpenRouter.
Claude Code
Anthropic's CLI agent, billed through your Claude.ai subscription — no API key needed.
Open the AI panel → ⚙ → Claude Code. The panel then guides you:
- Already on your system? ComIO.Studio detects it automatically — nothing to do.
- Not installed? The panel shows an Install button. Click it — the app downloads and installs Claude Code for you. No terminal, no Node.js, no commands, no admin rights.
- Sign in. After installing, the panel shows a Sign in button. Click it and log in with your Claude.ai account in the browser.
- Then choose a model (Sonnet, Opus, Haiku, …) and start chatting.
The model list comes from the installed CLI, so a new alias at the provider appears in the dropdown without an app update. Long-context models (Opus, Sonnet) get a [1m] suffix that asks the provider for a 1-million-token window; Haiku stays at its standard 200 thousand.
Codex
OpenAI's CLI agent, billed through your ChatGPT subscription — no API key needed.
Open the AI panel → ⚙ → Codex. The same one-click flow:
- Already on your system? ComIO.Studio detects it automatically.
- Not installed? Install button — the app installs Codex for you. No terminal, no Node.js, no commands, no admin rights.
- Sign in. Sign in button — log in with your ChatGPT account in the browser.
- Then choose a model (the list comes from your OpenAI account) and start chatting.
Codex sends images to gpt-5.5 automatically when you attach one — other Codex models on a ChatGPT account reject images.
Gemini
Google's CLI agent. This one works a little differently from the two above: it authenticates with an API key instead of an account sign-in, and it needs Node.js on your machine because the agent ships as an npm package.
- Already on your system? ComIO.Studio detects it automatically.
- Node.js first. If Node.js (with npm) is missing, the app will tell you and stop — install it from nodejs.org or with your system's package manager, then try again.
- Not installed? Install button — the app installs the Gemini CLI for you (
npm install -g @google/gemini-cli). The same button also updates it later. - Add your API key. There is no browser sign-in here. Create a key at aistudio.google.com/apikey and paste it into AI Settings → Gemini → API Key. The key stays on your machine.
- Then choose a model and start chatting.
Using the chat
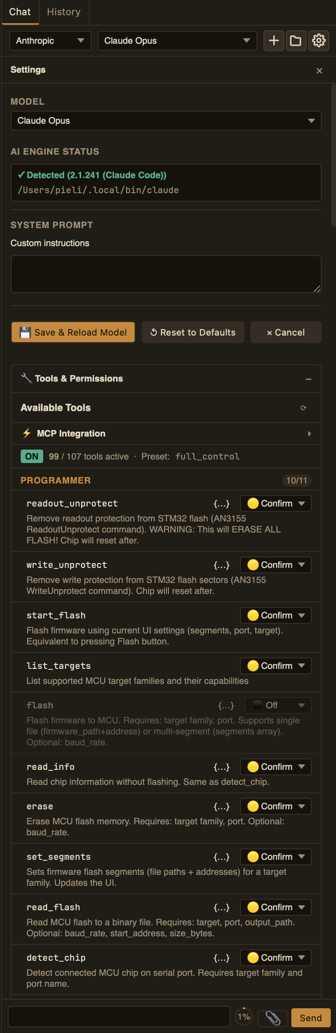
Settings — engine on the left, engine-specific options on the right
Two tabs sit above the chat:
- Chat — the main conversation.
- History — saved chat sessions. Click a row to load one; the trash can on its right deletes it. The trash can asks first — one click turns it red, a second click within a few seconds does the delete, and moving the mouse away cancels the question.
The ⚙ button opens the Settings panel as an overlay over the chat — engine choice and engine-specific options. Common to all engines: Temperature (response creativity — lower is more precise, higher is more creative) and AI Assistant Instruction (a custom system prompt that tells the AI how to behave, what domain to focus on).
Sending a message
- Type your question in the input field.
- Press Enter or click Send.
- The AI automatically sees your serial port config and recent terminal data as context.
- During generation the button changes to Cancel — click to stop.
- Click + to start a new chat session.
A small ring next to the send button shows how much of the context budget is used; hover it for the breakdown (used / budget / messages in window vs total). When history starts falling out of the window, the ring changes colour.
What you can ask
- “What protocol is this data?” — paste hex data for protocol identification.
- “Why is my device not responding?” — troubleshooting with context.
- “Write a Lua script that reads temperature every 5 seconds.”
- “Decode this frame: 01 03 04 00 64 00 C8” — byte-level Modbus analysis.
- “What baud rate should I use for this chip?”
- “Explain what my device is sending” — the AI reads the terminal buffer and analyses.
Tool calling
The assistant can call the app's tools for you — read a file, send a frame, clear the buffer, run a Lua script. When it wants to call one, a card appears asking your permission; approve it and the call runs, refuse it and the assistant answers without that tool. Per-tool permissions can be set to always ask, auto-allow or auto-deny, so a tool you trust can run without prompting and one you don't trust never runs at all.